Can’T Get Springs on Trampoline
If you’re like me, you love spending time outdoors on your trampoline. But one thing that can ruin a good time is not being able to get the springs on your trampoline. Here are a few tips to help you get the springs on your trampoline so you can enjoy it for years to come.
Springs are one of the most important parts of a trampoline, and without them, your trampoline won’t be nearly as much fun. But if you can’t get springs on your trampoline, don’t despair – there are still plenty of ways to enjoy your spring-less trampoline.
For starters, you can still use it as a regular bounce house.
Just take out the jump mat and let the kids (or adults!) have at it. You can also set up some obstacle courses or other games that don’t require jumping.
If you’re feeling really adventurous, you could even try using your trampoline as a slackline!
Just be sure to secure the line properly so nobody gets hurt.
No matter how you use it, a spring-less trampoline can still be tons of fun. So don’t give up on yours just because it doesn’t have springs – make the most of it and have a blast!
What is the Easiest Way to Put Springs on a Trampoline?
If you’re looking to add springs to your trampoline, there are a few things you’ll need to take into consideration. The size of your trampoline, the type of spring, and the number of springs needed will all play a role in how easy (or difficult) it is to put them on.
In general, however, the easiest way to put springs on a trampoline is by first measuring the circumference of the frame.
Once you have this measurement, you can purchase springs that are slightly longer than half the circumference. For example, if your frame has a circumference of 12 feet, you’ll want to purchase 14-foot long springs.
Next, use pliers to attach each spring at its center point to the inside of the trampoline frame.
Be sure to leave enough slack so that the spring can stretch when someone jumps on the trampoline. Finally, connect each end of the spring using hooks or clamps. Again, make sure there is enough slack so that jumping doesn’t cause any damage.
With a little bit of effort, adding springs to your trampoline can be a relatively easy process!
How Do You Put Springs on a Trampoline Hack?
If your trampoline has lost its bounce, it might be time to put new springs on it. This is a relatively easy process that you can do yourself with just a few tools. Here’s how to put springs on a trampoline:
1. Remove the old springs. This will involve unhooking them from the frame of the trampoline. If they’re corroded or otherwise difficult to remove, you may need to use a rust dissolver or other type of lubricant.
2. Clean the area where the springs will be attached. This will help ensure that the new springs grip properly and don’t slip off.
3. Attach the new springs.
Hook them onto the frame of the trampoline, making sure they’re tight and secure.
4. Test out the new springs by jumping on the trampoline! You should feel a significant difference in bounce compared to before.
What to Use to Put Springs on Trampoline?
Leaf springs are the most common type of spring used on trampolines. They are made of steel and designed to flex and absorb shock. Attaching them to the frame of the trampoline is relatively simple and can be done with basic tools.
Coil springs are another option, but they require special brackets and more time to install.
Can You Use a Trampoline With Missing Springs?
No, you cannot use a trampoline with missing springs. Springs are an essential part of a trampoline and provide the necessary tension and support for the mat. Without springs, the trampoline will not be able to bounce and will be significantly less safe.

Credit: sunshineandplay.com
How to Put the Last Springs on a Trampoline
If you’re like most people, you probably wait until the last possible moment to put away your trampoline for the winter. But did you know that there’s a right way and a wrong way to do it? Here’s how to put the last springs on a trampoline so that it will be ready for next season:
1. Remove all of the tension from the springs. You can do this by removing the spring covers and gently pushing down on each spring.
2. Once all of the tension is gone, fold up the trampoline mat and set it aside.
3. Unbolt each leg from the frame and set them aside as well.
4. Now you can remove the frame itself from the ground. Be careful not to damage any of the parts as you do this.
5. Finally, store everything in a dry, safe place until next season!
Trampoline Spring Hacks
Are you looking for ways to get the most out of your trampoline? If so, you’re in luck! There are a number of trampoline spring hacks that can help you maximize your jumping experience.
Here are four great hacks to get you started:
1. Use Washers to Extend the Life of Your Springs
If you want your springs to last longer, consider adding washers to them.
This will help distribute the weight more evenly and prevent wear and tear. Simply place a washer on each spring before attaching it to the frame.
2. Lubricate Your Springs Regularly
To keep your springs working like new, be sure to lubricate them regularly. You can use WD-40 or a similar product. Just spray it on and wipe away any excess with a rag.
Doing this once a month will help ensure that your springs are always in good condition.
3. Protect Your Springs from the Elements
If you live in an area with extreme weather conditions, it’s important to take steps to protect your springs from rusting or other damage.
One way to do this is by covering them with tape or another type of sealant when they’re not in use. This will help extend their life significantly.
4 Replace Worn Out Springs Promptly
Over time, even the best-made trampoline springs will eventually wear out and need to be replaced . When this happens , don’t wait too long to make the switch . Otherwise , you risk damaging the frame or mat . Also , keep in mind that worn out springs can also pose a safety hazard . So , if you notice any signs that yours are ready for retirement , don’t hesitate to replace them .
Trampoline Assembly Problems
If you’ve ever had the misfortune of having to assemble a trampoline, then you know the pain that can come with it. There are seemingly endless pieces to put together, and if even one is done wrong, the entire thing can be ruined. It’s no wonder that so many people have trouble when it comes to putting together a trampoline – it’s just not an easy task.
However, there are some things that you can do to make the process easier on yourself. First of all, make sure that you have all of the necessary tools and parts before you start. This might seem like a no-brainer, but it’s really easy to forget something when you’re in the middle of putting together a trampoline.
Secondly, take your time and don’t rush through the process. It might be tempting to try and hurry so that you can get onto the fun part (jumping!), but rushing will only lead to mistakes being made.
Finally, if you’re really struggling with putting together your trampoline, don’t be afraid to ask for help from someone who has more experience.
Chances are, they’ll be able to get it done much quicker than you would’ve been able to on your own. All in all, assembling a trampoline isn’t an easy feat – but it’s definitely doable as long as you’re prepared and take your time!
How to Attach Springs
Springs are a great way to add some extra tension and support to your projects, but attaching them can be tricky. Here’s a step-by-step guide on how to do it:
1. first, you’ll need to gather your materials.
You’ll need the spring itself, as well as some wire or string.
2. next, take one end of the wire or string and tie it around the top of the spring. Make sure it’s tight so that the spring can’t slip out.
3. now, take the other end of the wire or string and attach it to whatever you’re wanting to use the spring for. again, make sure it’s secure so that the spring doesn’t come loose.
4. finally, test out your project to make sure everything is working correctly.
If not, go back and check your connections to make sure they’re tight enough.
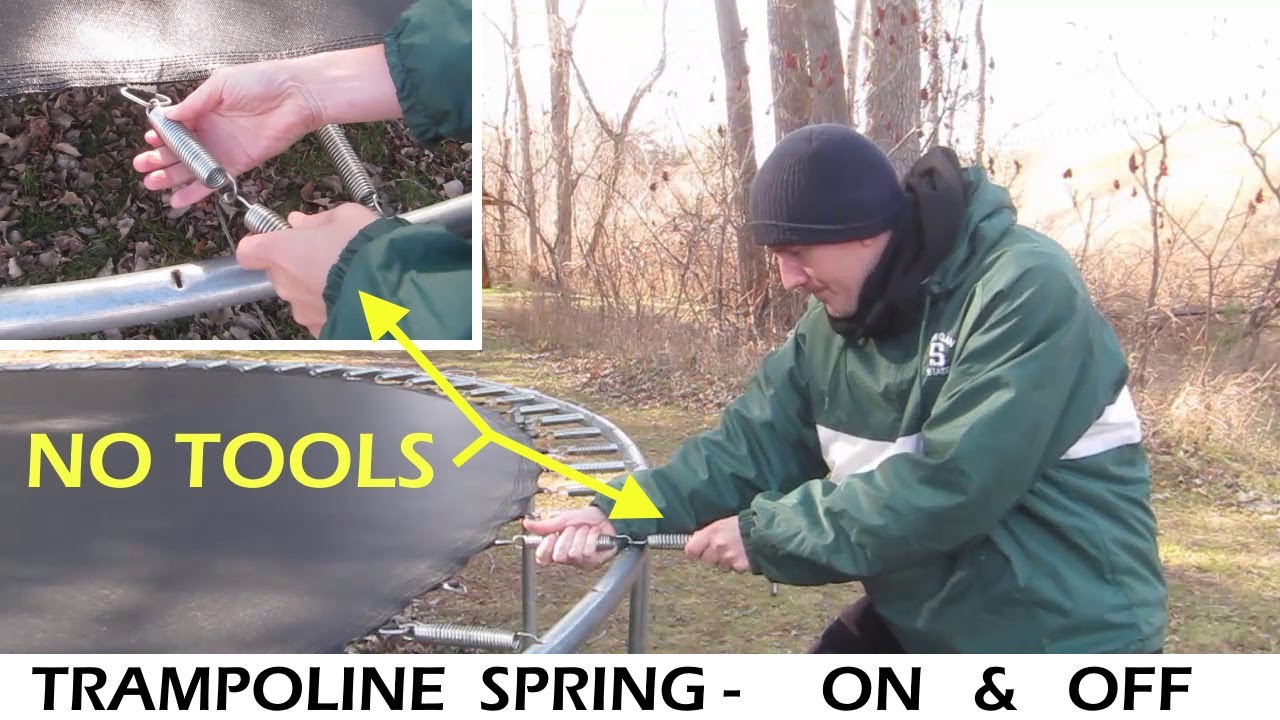
How to Take Trampoline Springs off Without Tool
Assuming you have no trampoline spring tool, there are a few ways you can remove your trampoline springs without one. The most common way is to use a pair of pliers. You will want to grip the bottom of the spring where it meets the frame and pull up.
Some people find it helpful to put the pliers on upside down so that the teeth are pointing towards you as you pull up. You may also need to twist the pliers as you pull up in order to loosen the grip of the spring on the frame.
Another way to remove trampoline springs without a tool is to use a screwdriver.
This method requires two people as one person holds onto the end of the spring while the other person uses the screwdriver to pry it off from underneath. It is important not to let go of the spring until it has been completely removed from its socket or else it will fly across the room and could potentially injure someone.
The final way to remove trampoline springs without using a tool is by using brute force.
This means that you simply grab hold of each end of the spring and pull until it comes out. This method requires a lot of strength, so if you are not very strong, it might be best to try one of the other methods first. Whichever method you choose, be sure that everyone in your household knows how to safely remove trampoline springs before attempting any sort of repair or maintenance on your equipment.
How to Tighten Trampoline Springs
Springs are an essential part of any trampoline, providing the tension and bounce that makes jumping fun. Over time, however, springs can loosen and lose their elasticity. This not only reduces the quality of your jump, but can also be dangerous if a spring were to come loose while you were using the trampoline.
There are a few things you can do to tighten trampoline springs and keep your jumping surface safe and bouncy. First, check all of the bolts that hold the frame together and make sure they are tight. Next, take a look at the mat and see if it is starting to sag in any areas – if so, you may need to replace some of the springs.
Finally, inspect each individual spring to see if it needs to be tightened.
If you find that your trampoline springs are getting loose, don’t wait to fix them! Loose springs can cause serious injury if someone were to land on them wrong.
With a little bit of maintenance, however, you can keep your trampoline in good condition for years to come – and enjoy many safe hours of bouncing fun!
How to Put Springs on a Rectangular Trampoline
You may be wondering how to put springs on a rectangular trampoline. Springs are an important part of a trampoline, as they provide the bounce. There are several ways to put springs on a rectangular trampoline, and the method you choose will depend on the type of trampoline you have.
If you have a traditional spring-loaded trampoline, then attaching the springs is relatively straightforward. The first step is to identify where the holes are located in the frame of your trampoline. Next, take a spring and loop it through the hole, making sure that the coils are facing downwards.
Once all of the springs are in place, you can start jumping!
If your rectangular trampoline has stretch bands instead of springs, then you’ll need to attach them slightly differently. First, identify where the hooks are located on your frame.
Next, take a band and hook it onto one side of the frame before stretching it across to the other side and hooking it on there too. Repeat this process until all of the bands are in place. And that’s it – you’re ready to start bouncing!
How to Remove Trampoline Springs
If your trampoline springs are beginning to show signs of wear and tear, it’s important to replace them as soon as possible. Not only will this help to keep your trampoline in good working condition, but it will also ensure that users remain safe while using it. Here’s a step-by-step guide on how to remove trampoline springs:
1. Begin by removing the mat from the trampoline frame. This will give you better access to the springs.
2. Using a pair of pliers, grasp onto one end of the spring and pull it away from the frame until it is completely detached.
Repeat this process for each spring on the trampoline.
3. Once all of the springs have been removed, take a look at the holes where they were attached. If there is any rust or damage present, use sandpaper or a wire brush to clean up these areas before attaching new springs.
4. To attach new springs, simply hook one end onto the hole on the frame and then stretch out the other end until it meets its counterpart on the opposite side of the frame. Make sure that each spring is securely in place before moving onto the next one.
5 .
Once all of the new springs are in place, reattach the mat and give your trampoline a test bounce!
Conclusion
If you’re having trouble getting springs on your trampoline, don’t worry – you’re not alone. Many people have the same problem. The good news is that there are a few things you can do to make it easier.
First, make sure that all of the springs are the same size. If they’re not, it will be very difficult to get them on evenly. Second, use a lubricant such as WD-40 or Vaseline to help the springs slide into place.
Third, try using pliers or a spring hook to help guide the springs into place.
With a little bit of patience and perseverance, you should be able to get those springs on in no time!
